This article details the complete process for recording, resolving, and approving equipment defects within your facility.
It explains how to document defects, track repair actions, update statuses, and restore equipment to operational use in compliance with regulatory standards and internal protocols.
In this article, you'll find this list of topics that you can click on to quickly access the information you need:
Record a Defect
-
Go to Facility>Equipment and click on the equipment's name
-
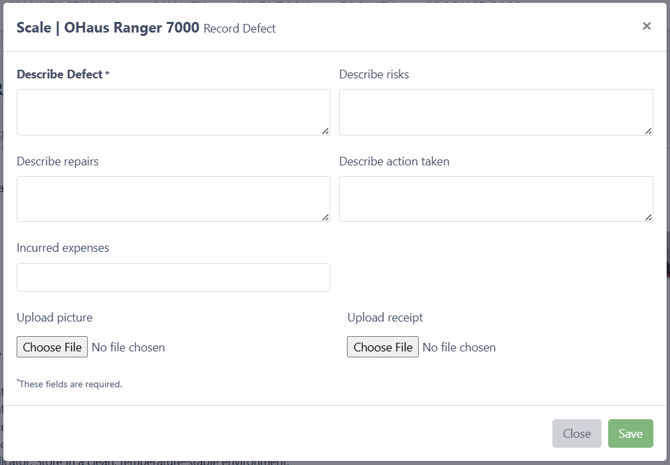
In the detailed view of the equipment, click on the green button Report defect

- The Record Defect window will open, where you need to Describe Defect, which is mandatory and a initial step
- Once you have identified a defect in your equipment, simply record it in the system and click Save to complete the action; You can also fill Describe risks in this step
- Record the Incurred expenses (if any)
-
Upload a Picture of the defect with proof of damage
-
Upload a Receipt
-
Click the green Save button to log the defect
Once a defect is recorded, your equipment will have the Status as Defect, and you cannot use this equipment in the system as long as the Status is not marked as Ok.
You can see your Equipment Status in:
-
Facility>Equipment>Overview Tab

-
Equipment Detailed View>Equipment Tab

-
Equipment Detailed View>Defects Tab

-
Facility>Dashboard (Equipment Status and Defect List)

Edit, Archive and Restore a Defect
Edit a Defect
Open the detailed view of the equipment with the defect you wish to edit. Then go to the Defects tab and simply click on the green Edit button.

The Defect window will open and you can change whatever you desire and Save it.

Archive and Restore a Defect
Open the detailed view of the equipment with the defect you wish to archive. Then go to the Defects tab and simply click on the grey Archive button.

A confirmation window will pop up, confirm the action to archive the defect .

You can restore the defect at any time, go to the Archive tab and click on the Restore button next to the defect you wish to restore.

Record Repairs and Action Taken
To record Repairs e Action Taken, open the detailed view of the equipment with the defect you wish to record. Then go to the Defects tab and simply click on the green Edit button.
Here you can register both Repairs and Action Taken, you can also add Incurred expenses, a Picture and a Receipt. You can Save it, or you can click on the Resolve Defect.

Resolve Defect and Approve Resolved
Resolve Defect
To Resolve the defect, open the detailed view of the equipment with the defect you wish to resolve. Then go to the Defects tab and simply click on the green Edit button.
You can review all the information and then click on the green Resolve Defect button.

A confirmation window will pop up, confirm the resolution to continue.

After the defect is resolved the status will show up as Resolved in yellow. This means that the resolution still needs to be approved.


Approve Resolved
To Approve the Resolved Defect, open the detailed view of the equipment with the defect you wish to approve. Then go to the Defects tab and simply click on the green Edit button.
You can review all the information and then click on the green Approve Resolved button.

A confirmation window will pop up, confirm the approval to continue.

After the resolution is approved the status will again show up as OK/Approved in green. This means that the equipment is again available for use.


