The software features two primary categories of container: Harvest Container and Waste Container, ensuring that both harvested goods and waste are handled appropriately and safely.
In this article, you'll find this list of topics that you can click on to quickly access the information you need:
Containers
Harvest Containers
Harvest container are designed to receive freshly harvested plants, allowing for efficient storage and management of the harvest. When required, harvested plants can be easily removed from the harvest container, ensuring flexibility in inventory management. Temporarily hold individual harvest batches while offering a clear overview of the current stock.
Click here to learn more on How to work with Harvest Containers.
Waste Containers
Waste containers are specifically designed to collect all waste generated during the harvesting and processing of plants. This can include leaves, stems, trim, flower, roots, and other materials. By using waste containers, you can effectively organize and manage your waste.
Click here to learn more on How to work with Waste Containers.
To view all of your containers, navigate to Facility > Containers. Here, you will find distinct tabs for Harvest Containers, Waste Containers, and Archived Containers, allowing for easy organization and access to each category.


Create New Containers
To add a new container in the Cannavigia system, follow these steps:
-
In the Containers page (Facility > Containers), click on the green button + Create container

-
The Create container window will open up
-
Give the container a Name
-
Select a picture for the container
-
In the Type field, choose if the container is a Harvest container or a Waste container
-
Harvest Container have an additional field called tare weight; this is the empty weight of the container
-
-
From the drop-down menu, select the desired Area
-
Click Save to create the container in the system

Edit Containers
If you need to edit the information of any container:
- In the corresponding container row, click on the green Actions button

- Select Edit Container
-
- For Harvest container: you can edit Name, Tare weight and by clicking on the image, you are able to select a new image
-
- For Waste container: you can edit the Name, add or edit a picture of the respective container
- For Waste container: you can edit the Name, add or edit a picture of the respective container
- Finish by clicking Save
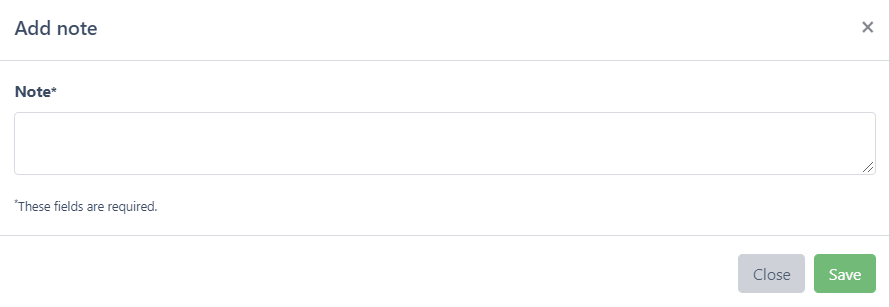
Add Note to Containers
To add a note to a container:
- In the corresponding container row, click on the green Actions button
- Select Add a Note
-
Enter your note/comment about the container
-
Click Save to create the note and return to the Containers page

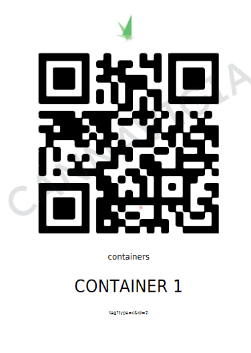
Print QR Codes Labels for Containers
You can generate a QR Code label for each container, choosing from various size options to suit your needs:
-
In the corresponding container row, click on the green Actions button
-
Then, click on Print label
-
Select the format (size) of the label and click on print selection
-
The print center will open, once your print job has the status done you can click on the printer icon to open the label
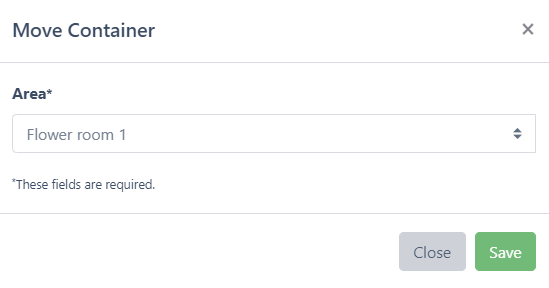
Move Containers
If a container changes location for whatever reason, this can be recorded like this:
- In the corresponding container row, click on the green Actions button
-
Click on Move
-
The Move container window will open up
-
From the drop-down list, select the Area to which you will be moving your container
-
Click Save to confirm that the container has been moved and close the dialog box
Archive and Restore Containers
If a container is defective or no longer usable for any other reason, it can be archived:
- In the corresponding container row, click on the green Actions button
- Click on Archive
- To restore a container, go to the Archive tab and click on the Restore button.

Clean Containers
To perform a cleaning follow these steps:
-
In harvest/waste container overview or detail-view Click on Action
-
Click the Perform Cleaning Button (the button appears greyed out when the container has content and cannot be cleaned)
-
Select the task used to clean the container
-
Access the SOP if attached and the read the description
-
Additionally you can write a description about the cleaning process
-
-
Click Save

The container is now marked as cleaned and ready for the next batch/waste.
Attention: Make sure the container is empty before cleaning. Loaded containers cannot be cleaned.