Once the planning has been completed and all necessary information is available, including the production schedule, required materials, and designated equipment, you can confidently proceed to start the production process.
In this article, you'll find this list of topics that you can click on to quickly access the information you need:
Start Production
Once the planning has been completed and all necessary information is available you can start the production.
-
Click on the green Start Production button in the middle of the progress bar

-
Select the area in which the production takes place and confirm that work area and equipment are clean and free from any starting materials, products, product residues or documents not required for this production
-
Click Confirm and the production is now in progress

Actions
Once production has started, you can perform various actions by clicking on the green Actions button located in the top right corner.


Log Waste

Click on the red Log Waste button
-
Fill in at least the mandatory fields
-
Waste description
-
Amount and Unit
-
- Click on Save

-
To remove waste click on the red Trash bin button in the Waste tab under the Actions column

-
 Click on the green Add Equipment button
 -
Select the used Equipment from the drop down menu
-
Click the green Add button
-
If you want to add additional equipment repeat steps 2 and 3
-
Once all equipment are added click on Close

-
To remove an equipment click on the red Trash bin button in the Equipment tab under the Actions column
-
To go directly to the equipment click on the green Edit button in the Equipment tab under the Actions column

Add Materials
-
 Click on the green Add Materials button
 -
In the Add Material tab:
-
Manually select the used materials from the Article drop down menu
-
Or click on Scan and use a connected QR code scanner to scan a valid article batch
-
-
Select the Article Batch to use, and enter the used Amount
Note: You can see the planned materials and amount in the Planned amounts tab.
-
Click the green Add button
-
If you want to add additional materials repeat steps 2, 3 and 4
-
Once all materials are added click on Close

-
To remove a material click on the red Trash bin button in the Materials tab under the Actions column

-
Enter a Reason for removing the used material
-
If you want to restore the amount to the source article batch click on the check box and this will restore the amount to the article batch it was subtracted from
-
Click Confirm to remove the used material

-
You can check the details of a removed material in the Materials tab by clicking on the green View button under the Actions column of the used materials

Perform Planned Tasks
-
Click on the Tasks tab
-
The list and order of planned tasks are displayed, to perform a task click on the green Perform task button under Actions

-
A window with the selected task opens
-
Clicking on the SOP file picture will open the uploaded file during task creation in a new tab
-
-
Enter Notes on the performed task
-
Click Save to perform the task

-
After a task is performed, you can edit the notes by clicking on the green Edit button under the Actions column

Perform Unplanned Tasks

Click on the green Actions button in the top right
-
Click on the green Perform Task button
-
Select the Task you would like to perform from the drop down
-
Enter Notes on the performed task
-
Click Save to perform the task

-
After a task is performed, you can edit the notes by clicking on the green Edit button under the Actions column

Record Observation
-
 Click on the green Record Observation button
 -
Enter your Observation and the Date and time of the observation, additionally you can upload a file
-
Click Save to record the observation

-
To see an observation go to the Observations tab and to see an uploaded picture click on the grey Picture button under the Actions column

Take Sample

Click on the green Take Sample button
-
Enter the Content, Amount and Unit as well as the Date of taking the sample
-
Click Create to take the sample

-
You can perform actions like Submit Sample to Lab for testing, Add QR Code to print center or View the details in the Samples tab directly under the Action column by clicking the corresponding button

Upload Document
-
 Click on the green Upload Document button
 -
Choose a file
-
Click Upload to save the file

-
To view a document go to the Documents tab and click on the grey Document button under the Actions column

Create by-product
Creating by-products article batches is meant for secondary products that may occur during production.
-
 Click on the green Create by-product button
 -
Choose the Article and the Article Batch Amount that was manufactured in this production
-
Adjust the Expiration Date if necessary (Expiration dates are defined in the article)
-
Set a manual Article Batch ID if you want to use your own batch coding system
-
It is possible to Upload a file to the created batch
-
Choose the Area and Subarea for this new batch
-
Click Create to create the new batch

-
The new batch will be opened in a new window tab in the Quality Control section to undergo analysis and be approved for release
-
To return to the production view, select the corresponding tab in your browser or close the new article batch
-
To view the new created batch go to the By-products tab and click on the green Edit button under the Actions column, and the new batch will be opened in a new window tab in the Quality Control section to undergo analysis and be approved for release

-
 Click on the green Add Packaging Materials button
 -
In the Add Packaging Materials window:
-
Manually select the used materials from the Article drop down menu
-
Or click on Scan and use a connected QR code scanner to scan a valid article batch
-
-
Select the Article Batch to use, and enter the used Amount
-
Click the green Add button
-
If you want to add other packaging materials repeat steps 2,3 and 4
-
Once all packaging materials have been added click the Close button

-
To remove a packaging material click on the red Trash bin button in the Packaging tab under the Actions column

-
Enter a Reason for removing the used packaging material
-
If you want to restore the amount to the source article batch click on the check box and this will restore the amount to the article batch it was subtracted from
-
Click Confirm to remove the used material

-
You can check the details of a removed packaging material in the Packaging tab by clicking on the green View button under the Actions column of the used packaging material

-
 Click on the green Move button
 -
Select the Target area from the drop down
-
Click Save to change the area of the production

-
You can change the time inside one area in the Area Log tab by clicking on the green Edit button under the Actions column, by changing the day and/or the hour when the movement took place

-
 Click on the green Print Label button
 -
Click anywhere on the grey area to leave the actions menu
-
You can see the red notification in the print center

-
Click on the Print Center and select your label printing options and create your label by clicking on the green Print selection button

-
A new window tab of the Print Center will open and you can download and/or print the QR Code label
Finish Production
When you have completed all tasks, documented all actions taken and the production is completed:
-
Click on the green Finish Production button on the right side of the progress bar

-
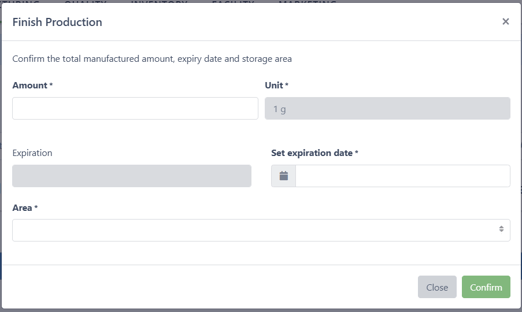
In the Finish Production window enter the total Manufactured Amount, Set an expiration date, and choose the final Area
-
Click on Confirm to finish the production
When the production is finished the batch is available in Quality Control to follow the release process, if a release process has been defined.